Saturday, September 5, 2009

Entertainment Center

I've been going crazy in our house changing things around. It's like a switch went on in my mind, I looked around and said, "I just can't take this!" It's nesting worse than I ever had when I was pregnant, and I'm not pregnant. I just got fed up.
The entertainment center above is a perfect example. It's been a great piece of furniture. My parents gave it to me for my birthday the year we got married. We've used it for ten years. It's really met our needs until lately. The TV has started to go on the fritz, so a flat screen is now imaginable in the future. This entertainment center doesn't fit in our basement, and has been put in a corner where it has caused trouble opening the doors on either side. We really just needed a change.
I finally became motivated enough to get off my duff and find our new option. It's a great piece of furniture at an extremely reasonable price -- and it's not even press-board! It's a wonderful change and we love it!

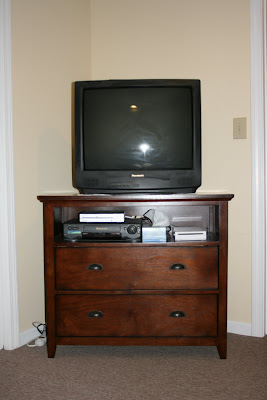
We love you new 'TV console'.

Pinwheel Progress


I've been working on my quilt this week. I'm finally getting back in to sewing now that school has started. I think it's looking pretty good! I took a Snippets turnover and then cut my own 6" squares and then cut them in half. I've got a bunch of these that I'm going to make into several quilts.
I did notice when putting up this picture that I had put a few orange next to each other. When you look at the quilt straight on, it doesn't seem quite so drastic. I think I'm going to start taking pictures BEFORE I sew the blocks to make sure I have the right balance in the future.

Thursday, September 3, 2009

Snippets Pinwheel

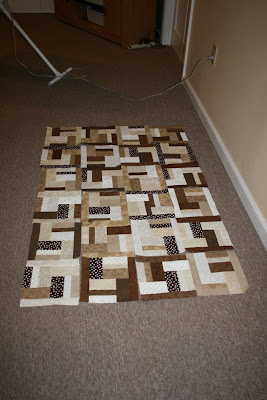
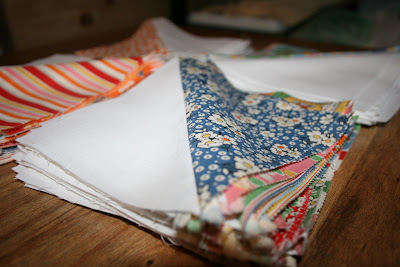
I've been working on my Snippets Pinwheel quilt this week. I'm loving how it looks so far. Hopefully my version will end up looking like the one I saw that started my whole adventure:


Sunday, August 30, 2009

Color Transformation


Our painting project is finally finished! It makes such a shocking difference in the room! I can't believe how dark it was with the red.

I will say that going from the dark red to white was a pretty intensive project. We had to use Kills as a primer to cover it. Then we did a coat of each color. When we took the tape off, we learned that the Kills was pulling off at the edges with the tape. What a pain! We had to do about 4 hours worth of touch up painting. But, I can honestly say that the paint job is the best one that my husband and I have ever done.

If you wondered if my husband is happy with the new room -- yep. He is. He can't believe the change and how much brighter it is in there. We spend a large portion of the day in there since my computer office is also my dining room. I love being in there and I really enjoy how classy it looks. I can't wait to pull together the wall decor and really make it shine!

Wednesday, August 19, 2009

Painting Day 1.5


I know it's almost impossible to see the differences in paint color here. And, I had to take the pictures out of focus because the camera couldn't find something to focus on. But, you get the general idea of where we plan to go.
Right now I think we're going to go with 'Hanoki' as the color. Check back. It seems to be changing by the hour.

Painting Day One

Here's what it looks like after one coat of primer. I think we'll do the color next -- that is if we ca decide on which one.

Temporary Hiatus


I've had to put a hold on sewing this week. I've forced my family into accepting a re-model of our dining room. I'm the only one that's really excited about it. My husband is a very reluctant participant. He has really enjoyed the red and isn't sure he wants it to go away. I have to give him credit though -- he's doing the work right along with me and not complaining one bit.
This red is where we started. I can't wait to see where we end up!

Fantastic Voyage Step #7

If you've been following along for the Fantastic Voyage quilt, we've reached step #7 -- putting the top together. I love this step! It always makes me feel like the time and creative energy was worth all the effort.
The trick to getting your top together correctly for this pattern is alternating the orientation for every block. The outside strips should be at 90 degrees from each other. It's easiest to look at the picture and figure it out. Promise!
I liked sewing two blocks together and then two additional blocks and so on. Then it's easy to iron them and stack them and then proceed to sew two to two. The four to four.
The final strips will each have 8 blocks. You should have eight strips of eight blocks each. By the time the entire quilt is assembled, it will be 8 blocks x 8 blocks.
That all came out a bit confusing sounding, but it should be pretty easy to interpret I hope.

Monday, August 17, 2009

Summer Quilt-a-long progress

This quilt has been such a challenge for me! I'm finally making real progress. I tried laying out all my squares on white fabric just to see what it would look like. I'm starting to like it, but it's so different from my usual attempts it's a mental struggle to work on it. I've been distracted with a million projects, but I'm promising to finish this one by the end of September. Pinky promise!

Tuesday, August 11, 2009

Toy Management

I love our basement! When were looking for a home, a usable basement was a must have! We've put the TV and all the kids toys down there. It makes the rest of the house much easier to keep clean.

Until two weeks ago, the toys were all over the place. I've been dreaming of these toy organizers from IKEA for years. This summer, the dream became reality. YEAH!!!! I love them! The kids are actually playing with the toys and then they clean them up every night before going to bed. It's amazing! My 20-month-old will clean up his own toys and knows that the bin needs to be put away before the job is finished. I'm in Mommy Heaven!
I've been thinking about how I could make the bins even cuter than they are, and here's what I've done -- I designed labels for each of them. There's both pictures and words so that kids of varying ages will know what's available and how to clean it up when they're finished using something.


I have a few bins left to finish, but I've run out of steam for a bit. I'll come back to it in a couple of weeks and finish the rest.

Yahoo!!!

This morning, I was missing my beloved EQ5 as I worked on my new computer. For my birthday this past year, I saved all my pennies and bought this great new laptop which I love, love, love! But, it is Vista, and I didn't think that EQ5 would work on Vista.

I tried it out and sure enough it works!
I've spent the morning playing with my long lost software friend. I've been dreaming up ways to use my wonderful Snippets fabric from Moda. It's a take on this quilt -- just a grown-up size using turnovers instead of a charm packet.
I'm off to sew!

Monday, August 10, 2009

Fantastic Voyage Step #6

I love getting to the part where it all starts to come together!

In this step, you're going to add the 1.5 x 8.5 inch strips to the side of each block. Use two strips of the same color for the frame on each block. It helps to give the quilt a small bit of consistency and definition.

Take your block as it is, then add one strip to the left, and one to the right. I did not use chain sewing on this step -- I wanted to make sure I was duplicating the correct color.

As always, iron each block. I have to lay mine out on the floor as I iron so that I can see the effect of the quilt as it starts to emerge. LOVE IT! This part always makes me feel warm and fuzzy!

Fantastic Voyage Step #5


You are going to sew two of your small blocks together in opposite directions. If you look at the picture above, you can see that the large pieces to the side end up on opposite ends from one another. This is what helps to give it such a scrappy look.

For this step, again you need to make sure that all the blocks look the same when you finish sewing them. The easiest way to do this is to set them into a stack, all facing the same way. When you pick up two to sew together, turn one so that it is in the opposite direction and then sew. Again, I used chain sewing to make this go really fast. After sewing the two halves together, iron and lightly starch them. It will make every step after a bit easier.

You should end up with 64 blocks -- our final number!

This step took about an hour.

Thursday, August 6, 2009

Fantastic Voyage Step #4

Step #4 -- It's starting to come together! Stack your mini-blocks all together. Turn the stack so that you have it with piece C on the bottom. Place another piece C (2.5 X 4.5) next to the piece you have already sewn. It should look like the block in the picture above. Sew with right sides together. Duplicate for all 128 blocks.

Iron and open.

I'm realizing that I may not have enough pictures for visualization. If someone actually reading this would like more detailed pictures, let me know.

Fantastic Voyage Step #3


Step #3 is also fairly easy. There's only one trick -- sew everything on the same side. Lay out your pieces from step #2. Next to them, place your stack of Piece C fabric. You're going to sew Piece C to the long side of your two pieces with the right sides together. It will make three parallel seams.

If you don't sew all the pieces on the same side, the next step in the quilt will not work properly. So use caution!

Iron open and starch. When finished, you should have 128 building blocks for your quilt that have three strips of fabric in each.

Wednesday, August 5, 2009

Fantastic Voyage Step #2

Step #2 is easy and fun. All you do is take two Piece A strips -- these are 1.5 x 4.5. Sew them together down the long side. I used the chain piecing method(where you don't cut the thread between each set of strips. That way it only took me about one hour to finish this step.
When you are finished, iron and starch as desired. I like stacking in groups of 10 so that I can be sure all 128 building blocks are there.

Fantastic Voyage Step #1

The first step in making this quilt is to cut all the little pieces. If you cut them all in the beginning, the quilt is a speedy assembly.
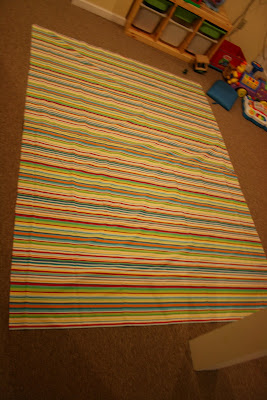
You can start with 12 half-yard pieces of coordinating fabric. Or, you can use two honey-buns and one jelly-roll (the pre-cut Moda fabrics). Either way, you're going to be cutting them into these same little pieces.
First, iron and starch all fabrics for a smooth start to cutting.
Then, prepare the following pieces:
Piece A --
  • 1.5 inches wide by 4.5 inches long
  • you will need 256 of these pieces
  • Pre-cut fabrics -- cut seven Piece A sized strips from each of the 40 fabrics included
  • Half-yard method -- cut three strips that are 1.5 inches wide from each of the twelve fabrics. Then cut those at 4.5 inch intervals. You will need eight Piece A to be cut from each 1.5 inch strip

Piece B --

  • 1.5 inches wide by 8.5 inches long
  • You will need 128 of these pieces
  • Pre-cut fabrics -- cut four Piece B sized strips from the second package of honey bun fabrics, making sure to use each of the fabrics included
  • Half-yard method -- cut two 1.5 inch wide strips from each fabric. Select two fabrics and cut an additional 1.5 inch strip from each. Then cut all of the 1.5 inch strips into pieces that are 8.5 inch long strips. You should get five Piece B's from each 1.5 inch strip
Piece C --
  • 2.5 inches wide by 4.5 inches long
  • You will need 256 of these pieces
  • Pre-cut fabrics -- cut seven Piece C sized strips from each of the 40 fabrics included in the Jelly Roll package
  • Half-yard method -- cut three strips that are 2.5 inches wide from each of the twelve fabrics. Then cut those at 4.5 inch intervals. You will need eight Piece C to be cut from each 2.5 inch strip

Phew! That's quite a bit of cutting. I believe the cutting took me about 2.5 hours to finish.

Wednesday, July 29, 2009

Beach Blanket

Beach blanket -- measures 65 inches by 91 inches

We've been spending a bit of time at the beach this summer. Not quite as much as I'd like, but enough that I have a tan line. We have a couple of major events coming up this weekend that will require time spent sitting on dirt and grass. So, I used it as motivation to make a beach blanket. I've had it in mind for a while now, just needed something to push me over the edge into actually doing the work.

Believe it or not, I actually had this HUGE piece of fabric in my stash. It's from back in the day when I used to make purses.
Here's the steps I used to turn it into beach blanket:

1. Cut the fabric in half from selvage to selvage.
2. Cut each piece in half again, from selvage to selvage.
3. Sew two pieces together along the selvage edge. Repeat for remaining two pieces.
4. Open both pieces of fabric up, and place them with right sides together. Pin around the perimeter. The selvage edges should match on both short sides.
5. Sew around the perimeter, leaving a 12 inch hole for turning the blanket inside out.
6. Turn it inside out. Iron the edges for a smooth finish. Iron the opening so that it will close evenly with the rest of the edge of the blanket.
7. Sew a second seam about 1/4 to 3/8 from the edge. This will help it to have a more finished look even when wrinkly.
8. Sew several seams similar to quilting lines inside the center of the blanket to keep the two halves together.
I hope this blanket has many sunny days in it's future!

Saturday, July 25, 2009

Fantastic Voyage Quilt

Fantastic Voyage measuring 65 X 65

I made this quilt for my mother-in-law to thank her for watching my kids for a week. I wanted her to have something special to help her remember just how much we love and appreciate her.
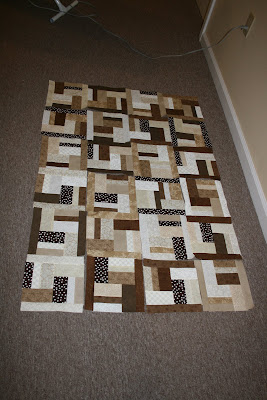
It was very unusual for me to do this kind of quilt -- normally I stick to traditional geometric shapes and patterns. Also, I use pastels and fruity type colors. So, this was stepping pretty far out of my comfort zone. As I worked on it, I kept asking myself, "Does this look OK?" or "Is this going to work???"
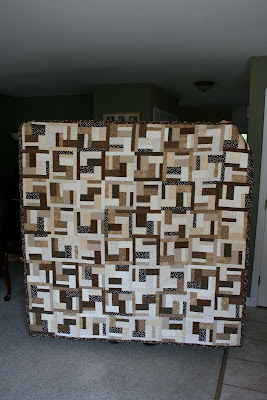
I think in the end it turned out very nice. The random patterning actually appeals to me now -- I think I'll be trying more like it in the future.

I like this quilt so much, I'll be putting a tutorial up in step-by-step form for you to use at your leisure. It will use pre-cut fabrics to make it even easier! Yeah! I love easy. I wish I had thought to use the pre-cut fabric before I cut all those little pieces by hand!

The Christmas Log Cabin


I started this quilt so many years ago it's hard to remember for sure, but I think I started it in 2003. I had this grand idea to make Christmas quilts for each of my siblings. Um. Yeah. Needless to say, that didn't happen. I just finished this quilt last week. So embarassing, but true.
Throughout the creative process on this one, I kept stumbling along. I think that's why it took so long to actually finish. I had trouble picking out the borders, the binding and the back. Christmas fabric that coordinated was often VERY ugly. Finally I found a combination that I think went together to produce a nice finished product.

Monday, June 29, 2009

Projects, Projects, Projects

I've been working on a thouand different quilting projects. I'll put pictures up here soon. I'll be putting this blog together over the next few weeks -- stay tuned!